OpenCms is open source. It is shipped under GNU Lesser General Public Licence (LGPL) version 2.1 or later. So you are free to extend or modify it to adjust it to your requirements.
Development scenarios are different, and so are the recommended working environments. You may:
- Only set up your website with OpenCms without adding extra Java-Code
- Add extra modules to OpenCms that include your own classes / libraries
- Extend, fix or alter the OpenCms core
Explore the topic to find out how to set up a suitable environment for your scenario.
Related links
1 What does "OpenCms development" mean?
When you set up a website with OpenCms you are already an OpenCms developer. You adjust OpenCms to the needs of your website, and add your own modules with templates and content types. But you may also dive deeper into the OpenCms internals. Here are three scenarios where you can work in as developer:
- In the simplest scenario, you only use the predefined functionality, add your own templates and content types (or adjust the demo template and content).
- In a more challenging scenario, you add extra Java code to your modules that handle special functionality of your website. So you extend OpenCms with your own functionality.
- The last scenario is, that you work at the "cutting edge". You contribute to the OpenCms core and get your functionality shipped with the next OpenCms versionOf course, that assumes your functionality is selected for being added.
Dependent on your scenario, the development environment will differ. The next sections will give you an overview on recommended development environments.
2 Scenario: Writing own templates and formatters
You need nothing special here. Just install OpenCms locally and start developing. You can export your modules and place them on your webserver's OpenCms installation when development is done.
To make development more convenient, we recommend to mount the (offline version) of the VFS. That prevents you from site switching and allows you to use your favorit editor for writing JSPs and XSDs.
3 Scenario: Adding own Java code to your modules
Your Java code will typically use the OpenCms Java API. For development, we recommend the Eclipse IDE with Gradle for build automation. If configured correctly, gradle will automatically handle all dependencies of your code to the OpenCms core.
In the remainder of the section, we describe how to setup your own Eclipse project.
3.1 Creating a project for your extensions
We recommend to create a Gradle project. This is done, choosing "File" -> "New" -> "Project" -> "Gradle project". Doing so, you get the following dialog:
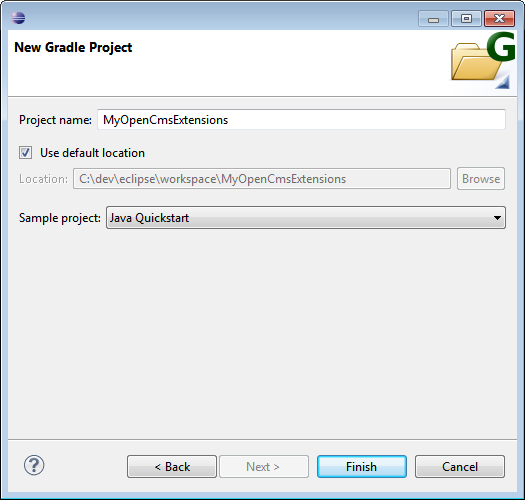
When the project is created, adjust it as follows:
- Delete the folders in the build path
- Add folder
src/to the build path - Replace the content of build.gradle by (a variation of) the code shown below.
apply plugin: 'java'

sourceCompatibility = 1.6
targetCompatibility = 1.6
version = '1.0'

repositories {
    mavenCentral()
}

sourceSets{
    main {
        java.srcDir 'src'
        resources.srcDir 'src'
    }
}

dependencies {
    compile group: 'org.opencms', name: 'opencms-core', version: '9.0.1'
}

jar {
    manifest {
        attributes 'Implementation-Title': 'OpenCms module', 'Implementation-Version': version
    }
}
When you adjusted your project, refresh the dependencies. Therefor, right-click on your project and choose "Gradle" -> "Refresh Dependencies". This will add the OpenCms core as dependency to your project and thus available for development.
3.1.1 Some background information about the Gradle configuration
OpenCms releases are available at http://mvnrepository.vom and Gradle grabs the dependencies from there. That's what you configure by
repositories { mavenCentral() }
…
dependencies { compile group: 'org.opencms', name: 'opencms-core', version: '9.0.1' }
Note that the core does not provide all modules usually provided by OpenCms. If you require further dependencies, search for them at the MVNrepository and copy the dependency string into your gradle.build file.
3.2 Write code, compile and add it to OpenCms
We recommend to place your code in packages that are named as the module that the code is shipped with. It's a convention, not law, but useful. In the packages, just add classes as you like. When your setup is correct. You should have full access to the OpenCms API, can look in it's code and get auto-completion.
When it comes to compiling, choose "Run as" -> "External tools configurations ..." and select "Gradle Build". In the appearing dialog, you add a new configuration for your project and select the task "jar". It will compile all your classes and put them in a jar file when you run the configuration. The resulting jar is found in the subfolder /build/libs/ of your project's main folder.
To expose the library in OpenCms, copy it to the folder /WEB-INF/lib/ of your OpenCms' webapp home folder on the RFS. When you want to ship the jar with your module. Add it in the module's /lib/ subfolder in the VFS and set the export point for that folder to /WEB-INf/lib/.
3.3 Additional hints
It may be a good idea to use git, to control different versions of your code. Also, you may consider to place the whole module in your project and put it under version control. You'll still edit module resources in OpenCms, but export the module and place the (unzipped) export in a folder of your project.
4 Scenario: Working at the OpenCms core
The source code of OpenCms is available from a git repository hosted at GitHub. Depending on your focus you may
- checkout the lates release and adjust it to your needs,
- checkout the latest code and participate at the main development.
Depending on the scenario, you will check out the code differently, but otherwise, your working environment is set up similarly.
4.1.1 Get the source for a release
To get the latest release, go to
and choose the release, you want to manipulate. Then:
- Download the source code
- Extract the source code archive to the Eclipse workspace
- Open Eclipse and add a new Java project where you use the name of the downloaded release as project name
- Right-click on the project and select "Configure" -> "Convert to Gradle"
- Refresh Gradle dependencies (dependency errors may remain, but are unproblematic)
4.1.2 Get the latest source
To check out the latest OpenCms version from GitHub via Eclipse, open Eclipse and:
- Choose "File" -> "Import ..." -> "Git" -> "Projects from Git"
- Click "Next" and select "Clone URI"
- Set "https://github.com/alkacon/opencms-core.git" as URI and click "Next"
- Select a branch and click "Next"
- Select "Use the New Project wizard"
- Uncheck "Use default location" and enter the repository's path as location
- Click "Finish"
4.2 Core development configuration
Once, you got the OpenCms source and have it present in a Gradle project, you can configure:
- the path were builds are placed: Therefore edit
gradle.propertiesin the project's main folder and edit theentry build_directory.
Once, configuration is done, you can build your project with Gradle. Therefore:
- Choose "Run as" -> "External tools configurations ..."
- Choose "Gradle Build" -> "{project name}"
- Choose adequate targets
- Click "Run"
You will have a lot of target to choose for building OpenCms. Here are the interesting ones.
Interesting build targets
- bindist
The target builds the
.zip-archive as it is downloaded when getting the OpenCms release for installation.- updater
The target builds the OpenCms updater.
- war
The target builds the
opencms.warfile as deployed to the servlet container.- dist_{module name}
The target builds the
.zipfile for the respective module, as you use it for module import.- jar_{module name}
The target builds the Java library (
.jar) for the specified module.- clean
The target removes all build results, i.e., cleans up.
When you run a target, the created files are placed in subfolders of the configured build_directory. In particular:
libs/contains.jarfilesclasses/contains.classfilesmodulesZip/contains.zipfiles of modules (as imported in OpenCms)distributions/contains files for distribution, i.e.,opencms.war,opencms-{version}.zip,updater.zip.- ... the other folders are not so interesting.