Since OpenCms 9.5 contents can be edited and added via a JavaScript-API. We call this feature “User-generated content”, short UGC. It allows to
- Let users generate/edit content without login
- Add/edit content from the online project
- Provide completely customized ways to fill and edit content
- Use client-side validation of content that goes beyond the validation rules in XSDs
- Build a back-end to an existing form that creates/alters an OpenCms XML content
There is nearly no restriction on how you fill a content or display content elements. Only concerning file uploads, you are tied to a form.This is necessary due to browser restrictions on file upload.
Using UGC, you can for example easily create:
- A blog
- A guest book
- Any kind of forms
- ...
1 General concept
UGC allows to create and manipulate content from the online project. You can map values stored in an XML content into a form and update the XML content with the from's values. Communication between the content and the form is session based. For security reasons, sessions are established at the server-side. Hence, you can control who can add or edit which content via which form.
To connect form and content in an established session, a JavaScript API is provided. To reduce the effort in writing lenghty mappings, a jQuery based wrapper for the native API is additionally available. It allows high level mapping operations of content elements and form fields. These operations capture the most frequent use cases.
2 Configuration of a UGC session
Each UGC session is initialized according to a given UGC configuration, i.e., an XML content of type ugc_config. The configuration allows various settings and can also be used to render the input forms used in a UGC session.
2.1 Creating a configuration content
We recommend rendering input forms used for UGC via formatters for UGC configuration content type (type ugc_config). The advantage is, that the configuration used to initialize the session is directly provided by the rendered content. Furthermore, you do not need to create a new content type just to render a form.A dynamic function is not very suitable because of the missing facility for head-includes.
Of course, depending on the content type for which content should be added or manipulated via UGC, the formatter must be very different. You can write many formatters and, depending on the content type for which content is accessed, choose the correct formatter via an element setting.
To add an input form for UGC to your page, you just add a content of type ugc_config (named "Form configuration for user-generated content"), edit it to configure UGC and choose the according formatter via an element setting. The formatter should manage the the server-side preparation for a UGC and render the input form.
2.2 Configuration options
Editing the configuration content, you can or even must provide the following configurations.
2.2.1 General settings
- Content type
The content type for which contents should be edited/added.
- Content folder
The folder, where content is loaded from, created in and stored to. For security reasons all operations on content are limited this single folder.
- Name pattern
The name pattern, defining the names given to newly created contents. The pattern has to use the macro
%(number), e.g., “ugc_%(number).xml”.- Locale
The locale in which the content is read/wrote.
- Guest user substitute
The name of the user that performs the content access when a guest user uses UGC. Users that are not logged in, i.e., guest users, have no permissions to access/edit/add content in OpenCms. Thus, to allow guests to use UGC, the access to the content must be performed by another user with the according permissions. If you do not set a user here, guest simply cannot perform UGC actions.
- Automatic publishing
If checked, new contents and alterations to existing contents via UGC are published directly. Otherwise, the changes remain unpublished till a user from the configured “Project group” publishes the changes.
- Project group
Group of users that can publish changes made via UGC. The changes are performed in a special project for each session. If “Automatic publishing” in this configuration file is not checked, the project is not published directly. Thus, a user with according permissions must publish the project.
2.2.2 Settings for file uploads
- Upload folder
Specifies the folder to which files are loaded up.
- Max. upload size
If set, the size (in Bytes) of each file that can be uploaded is limited to the set value.
- Valid extensions
A list of file extensions separated by “;”. If set, only files with listed extensions can be loaded up. Otherwise, there is no restriction on file extensions.
2.2.3 Security settings preventing DoS-Attacks
- Max. number of contents
Specifies the maximal number of contents allowed in the configured “Content folder”. If not set, the number is not limited.
- Queue wait time
The delay time between generating new sessions (in milliseconds).
- Queue maximum length
The maximal number of session that wait for creation. If more session requests are present at the same time, they are ignored.
3 Server-side preparation for a UGC session
To use the JavaScript API minimal server-side preparation is necessary:
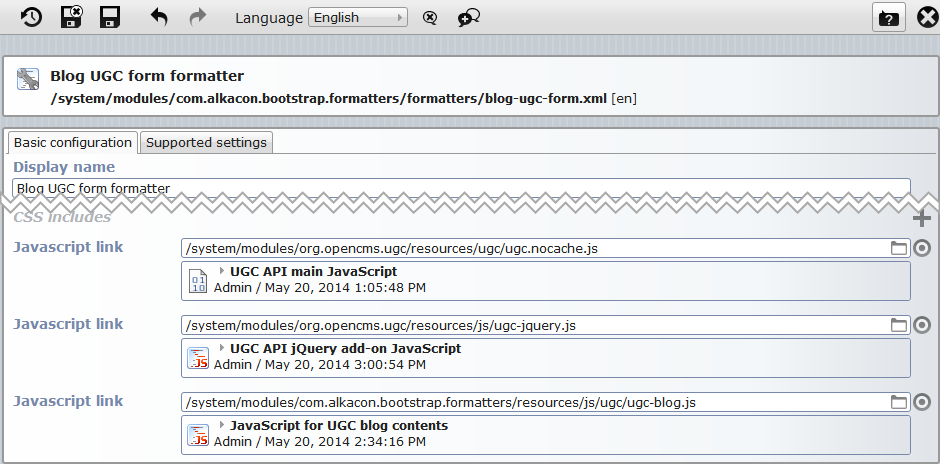
- Include the JavaScript file
ugc.nocache.jsvia a headinclude into the formatter that renders the form. The JavaScript file is shipped with the moduleorg.opencms.ugcand located in module's sub-folderresources/ugc/. The file exposes the UGC JavaScript-API.
Optionally, you can include the fileugc-jquery.js, found in the module's subfolderresources/js/. It exposes an easy to use wrapper for the native JavaScript API.
Here is an example formatter configuration that includes both JavaScript files plus an extra file that contains the form-specific JavaScript, using the API:
- In the formatter that renders the form: Use the tag
<cms:ugc>to create a UGC session and to expose the retrieved session-id in the HTML code by adding it as an attribute to the<form>-tag.
Here is an example formatter that does the preparation:
<%@page buffer="none" session="false" trimDirectiveWhitespaces="true" taglibs="c,cms" %>

<cms:formatter var="content">
<div>
    <%-- add some case distinction to show something else for new or currently edited contents --%>

    <%-- IMPORTANT: Here a UGC-session is initialized. The config path links to the UGC configuration file,
      -- the editId to the XML content that should be connected with the form (the UUID must be given),
      -- and var is used to expose the session-id of the established session
      -- If no editId is given (empty string), a new content is created --%>
    <cms:ugc var="ugcId" editId="${param.fileId}" configPath="${content.filename}" />

    <%-- render the form --%>
    <form
        id="ugcForm"
        ugc-id="${ugcId}" <%-- IMPORTANT: expose the session-id of the UGC session --%>
        method="post"
        role="form">

        <%-- render the form fields and buttons to save and/or (server-side) validate the input and/or cancel --%>

    </form>
</div>
</cms:formatter>- In the formatter, only two lines are special: The use of the
<cms:ugc>to initialize the session and the parameter at the<form>tag. Note, that is serves equally well for editing existing content (when providing the UUID of the content to edit via thefileIdparameter) or creating a new content (when not providing afileIdparameter).
3.1 Details on <cms:ugc>
The <cms:ugc> tag will most probably be used as in the above example, but it can be used with slightly different attributes.
To set up a session for a newly created content, you can omit the editId attribute:
<cms:ugc var="sessionId" configPath="${content.filename}" />The tag creates a new session and exposes the session-id via the variable set in the attribute var. If var is not given, the session-id is exposed via the variable formSessionId.
The attribute configPath is mandatory. Here the OpenCms VFS URI of the UGC configuration content that should be used to set up the session is given. Value ${content.filename} will yield the according URI if you use the tag in the formatter of a UGC configuration. This is recommended.
To create a session for editing an existent content use the tag as in the above example:
<cms:ugc var="sessionId" configPath="${content.filename}" editId="${param.fileId}" />The only difference to creating a session for a new content is: The file that should be accessed has to be specified. This is either done via the attribute editId, as in the example, or via the attribute editName. Using editId, you must provide the UUID of the (structure part) of the content to access. Using editName, you must provide the file name.The path is fixed via the UGC configuration content.
Session creation might fail. In this case errors are exposed to the JSP. If you add the attribute error="ugcError" to the <cms:ugc>-tag, the error is exposed via the given variable ugcError. If the error-attribute is not given, the error is exposed via the variable formError.
4 Using the object-oriented jQuery wrapper for the JavaScript API
For connecting a webform and an XML content via UGC you can either use the native JavaScript API, or the object-oriented, jQuery-based wrapper for this API. The wrapper provides a more abstract view on the connection between form and content. Thus, it probably helps to implement your own UGC connection easier than with the native API.
The wrapper has in particular the following advantages:
- You set up just one mapping relation between content elements and form fields and you can use it for getting values from the content and writing values to the content.
- The UGC object provided by the wrapper takes care of mapping relation.
- The UGC object provides several useful methods to manipulate the mapped values.
To use the wrapper, include it the respective JavaScript into your formatter as headinclude (see here). Then instantiate your own UGC object and use the object for all UGC specific actions. We recommend to make up a new namespace for your UGC code by wrapping it with $(function() { /* ... */ });.
In the following, we explain how to work with the UGC object. Note that we use the function names from the initialization section to refer to the respective callback or event handlers later on.
4.1 Initializing the UGC object
An UGC object is created via
var ugc = new UGC("ugcForm", myMappings, myErrorHandler, myFormInitHandler, myWaitHandler);where the arguments of the constructor are:
- the
idattribute of the<form>that should be connected to the content, - a function that initializes the mapping between content elements and form fields,
- a handler for server-side errors,
- (optional) a handler called when the form is initialized (i.e., when content elements are written to the form)
- (optional) a wait handler, called when data is send/received and when sending/receiving is completed.
Initialization must be wrapped in the function window.initUgc that is called, when the native API is ready:
window.initUgc = function() {
    if (ugc.initForm()) {

        // read the variables from the form HTML
        var sessionId = ugc.getForm().attr("ugc-id");
        backLink = ugc.getForm().attr("back-link");

        // initialize the form
        ugc.init(sessionId);

        // attach event handlers to the action buttons
        $("#saveButton").click(save);
        $("#validateButton").click(validate);
        $("#cancelButton").click(cancel)
        }
    }
The most interesting parts of the code are:
- The call of
ugc.initForm(): It checks, if the form with the id provided in the constructor exists, and only if so, it returnstrue. - The call of
ugc.init(sessionId): It initializes the mapping between content and form, registers the wait indicator, if given, and initializes the UGC session. Hence, the form is filled with the content values according to the mappings. Moreover, the optionally given form-init-handler is called.
4.2 Defining the mapping between form and content
The mapping of content elements and form fields is declared in the function myMappings (see the initialization of the UGC object). The function contains just a series of ugc.map(...) calls:
function myMappings() {
        ugc.map("title", "Title[1]", ugc.OPTIONAL);
        ugc.map("text", "Paragraph[1]/Text[1]");
        ugc.map("imagefile", "Paragraph[1]/Image[1]/Image[1]", ugc.UPLOAD);
        /* ... more mappings ... */
    }
The map method takes the name attribute of the form field and the XPath to the content element it should be connected with. Additional parameters specify the mapping type:
- If no extra parameter is given, the mapping is really one-to-one: The value from the is always mapped back to the content and the content value into the form.
- If it is
ugc.OPTIONAL, the content element in the XML content will be removed if the corresponding form field is empty. This mapping type should be used for optional content elements. - If it is
ugc.UPLOAD, the mapping will upload a file provided via the form field and link to that file in the content. This type is required for form fields of type<input type="file">.
Note that you can provide ugc.UPLOAD and ugc.OPTIONAL both as parameters.
The mapping is a central element of the UGC object. It is used internally for all the communication between form and content. The mapping stores also the values read from the content and has to be updated before you save changes to the content.
4.3 Saving values from the form to the content
Saving values is quite simple if no files are included. But, if files are included the upload procedure has to be done before values are saved to the content.
So, if necessary, the first thing to do is to upload files:
ugc.uploadFiles([ "imagefile" ], afterUploadHandler);The call to ugc.uploadFiles(...) does the job for you. Provide the list of field names that specifiy the form fields containing the files to be uploaded as first argument and a callback function that is called after a successful upload. If upload fails, myErrorHandler that is provided via the constuctor of the UGC object is called. If upload is successful the afterUploadHandler is called. It can update the mapping stored by the UGC object, such that it holds the values that should be saved and afterward write the updated values to the XML content:
function afterUploadHandler(uploadResult) {
    ugc.saveContent(updateValues(uploadResult), afterSaveHandler);
}
Saving is managed by ugc.saveContent(...). It takes the updated mapping as first argument and a handler that should be called after successfully storing the XML content. The handler typically destroys the UGC session and replaces the input form by a success notification, or redirects to another webpage.
Note that the handler has an argument: uploadResult. This parameter contains the VFS URIs of the uploaded files given in the order of upload. The URIs must be written to the XML content elements that should link to the uploaded files. Hence, the mapping values must be adjusted. You have to write a function updateValues(...) that handles these adjustments. Here is an example:
function updateValues(uploadResults) {

    ugc.setContent();

    var uploads = (typeof uploadResults === "undefined") ? null : uploadResults;
    if (uploads != null) {
        var image = uploads["imagefile"];
        if (image) {
            // an image was uploaded
            ugc.setContent("imagefile", image);
        }
    }

    return ugc.getContent();
}
In the updateValues(...) function we first copy the current input form values to the mapping. Second, we adjust the values for files that are uploaded and insert the links to the uploaded files. The function could also manipulate the mapping further, e.g., if a an optional nested content has none of its elements none-empty, it can be deleted. To explore and manipulate the mapping, the UGC object provides various methods.
4.4 Server-side validation of values
The values in a form may violate validation rules defined for a content. To check if this is the case, call:
ugc.validate(updateValues(), validateHandler)Calling ugc.validate(...) will send the values of the mapping (that we update with the function also used for saving values) given as first argument to the server and checks if the values can be stored in the XML content. The validationHandler given as second argument is called when the validation is performed and gets a map of validation errors as argument. A handler implementation could look like:
function validateHandler(errors) {
    // form validation handler that displays the results of the server side validation in a simple alert
    if ($.isEmptyObject(errors)) {
        alert("The values are valid!");
    } else {
        var out = "The following errors occurred:\n"
        for ( var key in errors) {
            out += "\n" + key + " : " + errors[key];
        }
        alert(out);
    }
}
4.5 Destroying the UGC session
When editing is finished the UGC session must be destroyed. This should happen at latest when leaving the page. Therefor, add
$(window).unload(function() {
    // make sure to kill the UGC session if the page is just left
    ugc.destroySession();
});
to your code. The call of ugc.destroySession(); will do the job.
4.6 Error handling
Whenever server-side errors occur, the myErrorHandler function provided in the constructor of the UGC object is called. A possible implementation is:
function myErrorHandler(errorType, message, additionalData) {
    // very simple error handler that just displays an alert box with the raw error text
    var out = "Error of type: " + errorType + ": " + message;
    if (!$.isEmptyObject(additionalData)) {
        out += "\n\nAdditional information:\n";
        for ( var key in additionalData) {
            out += "\n" + key + ": " + additionalData[key];
        }
    }
    window.alert(out);
}
4.7 Exploring and manipulating the mapping and the form
The UGC object provides various functions to explore and manipulate the mapping between the form fields and the XML content, and also the form. We just list the functions and give a very brief description.
Exploring and manipulating the mapping
-
getContent(name?) Returns the value of the element of the local content specified by
name. If no argument is provided the whole local content is returned.-
setContent(name?) Reads the content value from the form field with name
name. If name is not provided, it reads the values of the whole form into the local content.-
deleteContent(name) Delete the content element with the given
name(the field name used for setting up the mapping) when saving changes.-
deleteParentContent(name) Delete the parent content element of the element with the given
name(the field name used for setting up the mapping). This can be useful, if a whole optional nested content should be removed if (some of) it's values are not set.-
contentHas(fieldname1,fieldname2,...) Checks, if all content elements assigned to the form fields listed as arguments have a non-empty value.
-
contentHasNot(fieldname1,fieldname2,...) Checks, if all content elements assigned to the listed form fields are empty.
-
contentHasOne(fieldname1,fieldname2,...) Checks if at least one of the content elements assigned to the listed form fields is non-empty.
Exploring and manipulating the form
-
getForm(name?) Returns the HTML element of the form's input field specified by
name. Ifnameis not given, the method returns the HTML element of the whole form.-
getFormVal(name) Returns the current value of the form's input field specified by
name.-
setForm(name?,value?) If called without parameters, the method fills all content values into the form. If called with a
name, it fills only the form fieldnamewith the assigned content value. Ifnameandvalueare given, it fills the form field name with value.-
formHas(fieldname1,fieldname2,...) Checks, if all form fields listed as arguments have a non-empty value.
-
formHasNot(fieldname1,fieldname2,...) Checks, if all form fields listed as arguments have an empty value.
-
formHasOne(fieldname1,fieldname2,...) Checks if at least one of the listed form fields is non-empty.
5 Using the native JavaScript API
In the following, we show several code snippets that explain the JavaScript API. Note, that the code uses also jQuery, but it is not necessary to use it for working with the native JavaSript API.
5.1 The frame for your code
$(function() {
    var session = null;
    var content = null;
    var formId = "myFormId";

    // function registered as wait callback
    // argument: boolean, indicating if waiting for a Server reply
    function waitCallback(isWaiting) {
        if (isWaiting) {
            // …
        } else {
            // …
        }
    }

    // function registered as client error callback
    //argument: string array with stack trace
    function clientErrorCallback(error) {
        // …
    }

    // … ALL FUNCTIONS EXPLAINED IN THE FOLLOWING SUBSECTIONS …

    window.initUgc = function() {
        // set the wait indicator callback
        OpenCmsUgc.setWaitIndicatorCallback(waitCallback);
        // set the client-side error callback
        OpenCmsUgc.setErrorCallback(clientErrorCallback);
        // … do whatever else you want, e.g., get a session object:
        // Assumption: sessionId is exposed at the <form>-tag as attribute
        //             “session-id”
        var sessionId = $( "#" + formId ).attr("session-id");
        getSession(sessionId); // getSession() is a function you have to write
                               // see the next subsection.
    }

    $(window).unload(function() {
        if (session != null) { session.destroy(); }
    });
});
Interesting in the above code fragment is:
- The code is placed in a separate scope (via the surrounding “
$(function () {…});”). In the scope we have a scope-“global” variable storing the current UGC-session. Moreover, we declare a variable to store the content read from the server and possibly other variables may be useful, such asformIdin the example. window.initUgcis a function defined by the UGC JavaScript API and overwritten in the above code. The function is called when the UGC API is completely loaded and ready to use. In this function you should:- Set a wait indicator handler (optional)
- Set an error handler for client-side errors (optional)
- Get the session object for the current session
initUgc is called! This leads to errors, since the API may not be loaded.- The established session is destroyed when the page is left (calling
session.destroy()in(window).unload(…)).
5.2 Getting the session object and the content’s values
// called to get a session for an existing content (specified by the session id)
function getSession(sessionId) {
  var elem = document.getElementById( formId );
  OpenCmsUgc.initFormForSession(
      sessionId     // session id used to establish a session for an existing content
                    // must be provided by the server somehow
    , elem          // the form used to display/edit the content
                    // can be null if no files are loaded up
    , onNewSession  // callback handler on success (session as argument)
    , errorHandler  // callback handler for server-side errors
  );
}

// error handler, used as callback function to display server-side errors
// argument types: String, String, Map
function errorHandler(errorType, message, additionalData) {
  // …
}

function onNewSession(s) {
  session = s; // store the returned session as scope variable
  content = session.getValues(); // get the content values
  // … e.g., fill your form, show a picture from the content, …
}
The function getSession() calls OpenCmsUgc.initFormForSession() to get a session object. The parameters are explained in the source code.
When a session object is successfully returned, onNewSession(s) is called with the session object as argument. We store the object in our scope-“global” variable session and store the content’s values, that are returned by session.getValues(), in content. The content’s values are given as map with the XPaths to the content’s elements as keys and the respective values as values. For example, content["Paragraph[1]/Text[1]"] will yield the content’s value from the node “Paragraph/Text”.
5.3 Filling the form, validating and saving changes
The form can be filled as soon as the content is loaded. Just copy the content values to the form fields, e.g.:
function fillForm() {
  if (content != null) {
    $("input[name='titlefield']").val(content["Title[1]"]);
    $("input[name='textfield']").val(content["Paragraph[1]/Text[1]"]);
    // …
  }
}
Of course, more complex mappings of values are possible.
Before uploading the form values to store them in the content, they have to be mapped to a map that assigns XPaths to values, like the map in which contents was returned from the server.
function updateValues() {
  var result = {} ;
  result["Title[1]"] =  $("input[name='titlefield']").val();
  result["Paragraph[1]/Text[1]"] = $("input[name='textfield']").val();
  // …
  return result;
}
Note that there is a special treatment for file uploads. There you can’t just copy the form’s input to the content. You must upload the file before and then get back the link to the file from the server. See below for this.
Note also: To delete an optional node from a content, you must set its value explicitly to null. If the node is just not part of the result map, it remains unchanged. Thus to delete a node, add
result["XPath[1]/To[1]/Node[1]"] = null;to the result map. To leave a node unchanged, just do not add an entry for the node’s XPath to result.
Having updated values, you can validate or save them:
function validate() {
  var newValues = updateValues();
  session.validate(newValues, validationReplyHandler)
}

function validationReplyHandler(errors) {
  // handle the errors that are provided as
  // map “XPath of the element (String) -> error message (String)”
}

function save() {
  session.uploadFiles(["uploadfield"], saveContent, errorHandler);
}

function saveContent(uploadResult) {
  var newValues = updateValues();
  var pic = uploadResult["uploadfield"];
  if (pic) { // file for upload is given
    newValues["Paragraph[1]/Image[1]/Image[1]"] = pic;
  }
  session.saveContent(
      newValues
    , function(s) {
       // handler called on successful upload, s is the empty string
      }
    , errorHandler
  );
}
To validate your values against conditions defined in the XSD of the edited content’s type, call session.validate(values, replyHandler). After validation, the reply-handler is called and fed with a map containing the errors that occurred during the validation.
Saving content is very easy when no file upload is included, then just call session.saveContent(values, successHandler, errorHandler). If files need to be loaded up, then first call session.uploadFiles(filefieldlist, successHandler, errorHandler) and update the content only on success. How to use this function should be clear from the above example.
5.4.1 Convert a VFS URI to a valid link
session.getLink(OpenCmsVfsLink, function(realLink) {/* use realLink */});The getLink() function takes a OpenCms VFS URI, e.g., the link to a picture as stored in a content, and converts it into the URI that is used to access the linked resource from the browser. The generated link is given as argument to the callback function.
5.4.2 Get the VFS URI of the edited content
var contentVfsUri = session.getSitePath();The returned URI is the relative to the current site, e.g., /.content/post/post_00014.xml. To use it as link in the browser, apply session.getLink() (see here).
The function might be used, e.g., to link to the detail page for the content after successfully saving it.
6 Some implementation details
Actions performed via UGC are always performed in sessions. To add or edit content via UGC, a new session is created. This means: A new project is created in OpenCms, and a new session object is created. The session object is exposed to the client via a session-id written somewhere in the HTML code. The id is used by the UGC JavaScript-API to get the session object. This object provides facilities to access and edit XML content in the newly created project.
A project created for a session is removed when it is published. This can, depending on the configuration, either happen when the session object is destroyed or when a user with the according rights publishes the project.
Note that UGC sessions are created on the server-side via a special JSP-Tag. Server-side code for session initialization is a matter of security: The full control on which user can edit/add which content in which situation is preserved on the server-side.
7 Further reading
More information on User-generated content is found in
- OpenCms JavaDoc: Look for the package
org.opencms.ugc.client.exportto get detailed information on the JavaScript-API opencms.tld(and the according documentation): Here you find information about the tag<cms:ugc>- OpenCms Demo Website: Watch out for an example for User-generated content.