In OpenCms content and layout are strictly separated. To render content of a special content type, several formatters can be provided. Each formatter can be configured to be used according to the container where the content is placed.
We explore the basic structure of a formatter and shown in detail how to configure it.
1 How content is rendered
All HTML rendered in OpenCms is rendered via JSPs. Thus, also the HTML that displays content is rendered via JSPs. A JSP that renders content is called formatter. A formatter is configured via a formatter configuration. The configuration specifies content of which type is rendered with which formatter in which situations.
Additionally to information about where to use a formatter, the configuration can contain information about special settings available for the formatter. These are called element settings.
2 Where to place a formatter and its configuration?
Formatters and their configuration are usually shipped with modules and both placed in the formatters/ sub-folder of a module. Since a formatter and its configuration are closely related, they typically get identicial names (except the suffix).
If formatters, configurations and content type definitions should be placed in the same module is a design decision where two options may be advantageous:
- You can place content type definition, formatters and configurations in one module and make up modules for particular content types. Then you can add and remove the individual content types easily.
- You can place content type definitions in another module than formatters and configurations. Then you can easily reuse the same content types with a different set of formatters.
3 Formatter configuration
Formatter configurations are XML contents of type "Formatter configuration" (formatter_config). They connect resource types (typically content types) with formatters (JSPs that render the resources).
3.1 Adding and editing a formatter configuration
Use the traditional workplace's explorer view to add and edit a formatter configuration. Navigate to the folder where the configuration should be placed and click "New" -> "Other options" -> "Formatter configuration" to add a new formatter configuration.
The typical name for a formatter configuration is similar to the configured formatter's name. The usual suffix is ".xml".
To edit a formatter configuration right-click on it and choose "Edit". The form based content editor opens.
3.2 What is specified in a formatter configuration?
Here is a formatter configuration:
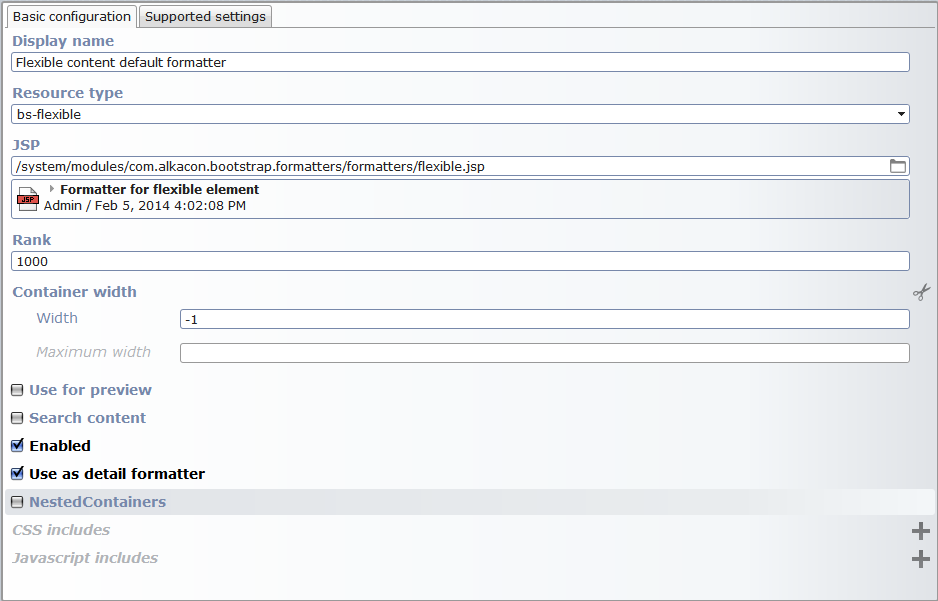
In the tab "Basic configuration", you define the formatter and the type of the resources that are rendered with this formatter. Moreover, you provide a name for the particular formatter configuration, define when to use the formatter and tell what head-includes have to be added to make the formatter work.
Options set in the "Basic configuration" tab
- Display name
When you select the formatter for a content, or you add/remove formatters in the sitemap configuration, this name is presented in the select box to identify the formatter.
- Resource type
The type of the resources that should be formatted with the configured formatter.
- JSP
The formatter to use.
- Rank
Formatters for resources of the same type are ordered by rank. If more than one formatter is available when you place a resource at a page, the formatter with the highest rank is chosen by default. (The choice can be altered manually via a setting that is automatically available for elements that can be formatted with different formatters.)
- Match
Match defines in which containers a formatter can be applied. You can either specify containers via their
widthattribute or via theretypeattribute. If you choose width, the value specified as "Width" in the formatter configuration corresponds to the minimal width a container must have (set as "width" attribute), and the optional "Maximum width" specifies the maximal value of the width attribute that is allowed in case the formatter should be appliable.- Use for preview
Resources can be previewed in the "Add wizard" or in the workplace's explorer. Check this option, if the formatter should be used for such previews.
- Search content
If a resource is added to a page, it's content may or may not be indexed for the page. If this option is checked and the resource is searchable at all, the page where it is placed will be found, when you search for content of the resource.
- Enabled
Check this option to make the formatter automatically available in the page editor. If the option is not checked, you can make it available via the sitemap configuration.
- Use as detail formatter
If checked, the formatter can be used when the resource is rendered in detail view.
- Nested containers
Check this option, if the formatter introduces a nested container.
- CSS includes
Add formatter-specific CSS styles here. See here for details.
- Javascript includes
Add formatter-specific JavaScript here. See here for details.
In the tab "Element settings" you can configure element settings. These settings are shown when you click the ![]() symbol at an element that is rendered with the formatter. The content editor can alter these settings to adjust the behavior of the formatter. A demo on how to use element settings is found here.
symbol at an element that is rendered with the formatter. The content editor can alter these settings to adjust the behavior of the formatter. A demo on how to use element settings is found here.
4 Writing a formatter
A formatter is a usual JSP (type jsp). The special part is the use of the tag <cms:formatter> that exposes the content of the rendered resource.
4.1 Adding and editing a formatter
Use the traditional workplace's explorer view to add and edit a formatter. Navigate to the folder where the configuration should be placed and click "New" -> "JSP" to add a new formatter.
The typical name for a formatter is somehow related to the name of the rendered resource's type. The usual suffix is ".jsp", but dependend on what the output of the formatter actually is, this can differ. For example, it could be ".css" or ".pdf".
To edit a formatter right-click on it and choose "Edit sourcecode". The source code editor opens.
4.2 A typical formatter
Here is an example of a typical formatter. It is kept simple but shows typical characteristics of a formatter.
<%@page buffer="none" session="false" trimDirectiveWhitespaces="true" taglibs="c,cms" %>

<cms:formatter var="content" val="value" rdfa="rdfa">
<div class="margin-bottom-30">
    <%-- Title of the article --%>
    <div class="headline"><h3 ${rdfa.Title}>${value.Title}</h3></div>
    <%-- The text field of the article with image --%>
    <div class="paragraph">
        <c:set var="showing" value="false" />
        <c:if test='${value.Image.isSet and (cms.element.settings["showImage"] eq "true")}'>
            <c:set var="showing" value="true" />
            <c:set var="imgwidth">${(cms.container.width - 50)}</c:set>
            <cms:img src="${value.Image}" width="${imgwidth}" scaleColor="transparent" scaleType="0" cssclass="left" />
        </c:if>
        ${value.Text}
        <c:if test="${showing}">
            <div class="clear"></div>
        </c:if>
    </div>
</div>
</cms:formatter>
Here are the interesting spots of the formatter:
- As in each JSP, the used taglibs have to be included, here done via
<%page ... taglibs="c,cms" %>. - The code that produces HTML is framed by
<cms:formatter var="content" ...><div ...> ... </div></cms:formatter>. This is typical for all formatters. The<cms:formatter>exposes the content that should be rendered via an CmsJspContentAccessBean. In the example, the variablesvalueandrdfa, exposed via the attributesvalandrdfaare only abbreviations forcontent.valueandcontent.rdfa.
Note: It is important to have a <div> directly nested as only child of the formatter tag. Otherwise, the content may not render as expected (in particular in the page editor). - The formatter tests if element are present in the currently rendered content, e.g., via
value.Image.isSetin the example, and inserts content values in the HTML, e.g., viavalue.Titlein the example. - The formatter is sensitive for element settings. In the example, the image is only rendered if the setting
showImageistrue, which is checked viacms.element.settings["showImage"] eq "true". - The formatter enables inline editing - here only for the Headline by adding
${rdfa.Title}to the<h3>tag.