OpenCms ships with a demo website. It is meant to demonstrate OpenCms features, has a special focus on new features and takes a "what is possible" approach to show things. The demo has mainly two purposes:
- It is a very rich source of information on how to use OpenCms.
- It can be cloned and adjusted to set up your own website.
For the first purpose, the complexity of the examples is somewhat hindering. Therefor, we provide some background information on the demo here.
For the second purpose, the demo for OpenCms 9.5 is perfectly suitable if you want to base your website on Bootstrap. The demo includes contents that allow your building Bootstrap grid layouts like in a modular construction system. The structure of the demo modules makes it easy to clone and adjust them.
Here we, provide you with some details on the demo that will help you to get the most out of the demo as source of information and also make it easy for you to reuse the demo modules for your own website.
1 What belongs to the demo?
The demo consists of five modules. Here's a short description of these modules:
The demo modules
-
com.alkacon.bootstrap.basics Contains resources of used frameworks/libraries
- Bootstrap
- Boostrap paginator plugin
- JQuery
- JQuery-UI
- Unify Bootstrap theme
-
com.alkacon.bootstrap.formatters Contains all
- Formatters (for all contents of the module
com.alkacon.bootstrap.schemas) - Templates
- Template resources
- Dynamic functions
- Localization for formatters
- Formatters (for all contents of the module
-
com.alkacon.bootstrap.schemas Contains all
- Resource type definitions
- Schema files
- Localization files for schemas
- Element views
-
com.alkacon.bootrap.search Contains the GWT generated resources for the integrated search.
-
com.alkacon.boostrap.contents The content of the demo website. This module has no module folder - it only contains the contents under
/sites/default/(except thedocumentation/subfolder). The content module also adds some users that have the new roles added in OpenCms 9.5.
2 The grid demo - a bootstrap wrapper
The OpenCms 9.5 demo is a bootstrap wrapper. The intention is to:
- Start with an empty page (the template exposes only one big container for the body)
- Add template rows with different columns to set up the "rough" design of a page. This is done by the template developer.
- Add layout rows into the cols of template rows for the "fine-tuning". This can be done by content editors.
- Add content into cols of layout rows. This can be done by element authors (if not configured differently).
The difference between layout and template rows are mainly the permissions: Template rows must be created and added to pages by template developers. Also layout rows are created only by template developers - but they can be added to pages by content editors (role editor or element author).
Moreover, the containers exposed by template and layout rows can be restricted, such that only template developers can add contents, or also content editors.
2.1 The bootstrap grid system
Bootstrap is a framework for responsive web-design. The heart of bootstrap is a grid system. A bootstrap page consists of a series of rows that contain columns. Each row is by default devided into 12 equally wide parts and a column can span over 1 to 12 of these parts. Each colum itself can include a row again.
The responsive part is: Bootstrap distinguishes four devices by screen width. And the width of columns can be given for each of these devices.
| Device type | Extra small devices (phones) | Small devices (tablets) | Medium devices (Desktops) | Large devices (Desktops) |
| Screen size | <768px | 768px-991px | 992px-1199px | >= 1200px |
- For more information on bootstrap, see www.getbootstrap.com
2.2 Building a bootstrap page with the OpenCms demo
To build a bootstrap page with the demo contents, works like using a construction kit. You just have to combine building blocks.
Thus, if you want a design with header, body and footer, you may place three template rows in page container that is exposed by the template.
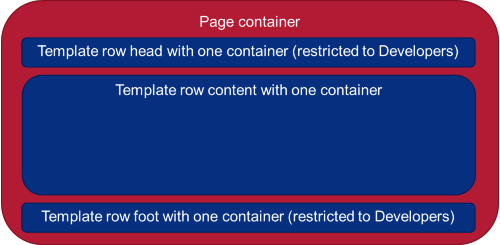
Note that the containers exposed by the template rows have different permission restrictions: header and footer can only be filled by template developers.
Having the above basic layout, you can move on adding layout rows. For header and footer a template developer could add layout rows where again only template developers can add contents. In the template row for the content, all template developers, and editors can add layout rows (where only template developers can create new such rows). Element authors cannot add layout rows. They do not see the corresponding element view. For example, the page could look as shown in the figure below after layout rows have been added.
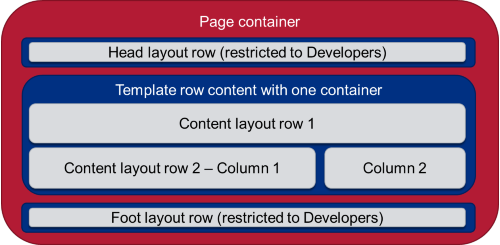
When once layout rows are present, content can be added. In our template, content in headers and footers can also only be added by template developers. In the other layout rows, content can be added by every logged in user.
Thus, content editors can add content as shown in the figure below.

2.2.1 Typical way to work with the grid layout
The way to build your webpage is typically as follows:
- The template developers provide template models that have build up the page structure the far that all containers where only template developers can add content are already filled
- Editors can add layout rows and content (where it is allowed)
- Element authors can add content (where it is allowed)
2.3 Element views for separating tasks
Building up a page with the grid system involves three different steps:
- The "rough" layout via template rows
- The "fine-tuning" via layout rows
- Adding content
Each task has its own element view: The "Template" view for template rows, the "Layout" view for layout rows and the "Default" view for adding content. Note also that not everyone can see the "Template" view. It is only visible if you are a template developer.
This separation does not only make up a clearer separation of concerns, it also omits overlapping edit points.
3 Technically interesting spots
The demo is a good source of information for many features of OpenCms. Here we pick only some of them.
3.1 The element views
The demo defines two new element views, they are located under /system/modules/com.alkacon.bootstrap.schemas/elementviews/. Since they are of type elementview, they are automatically considered as element view by the system, i.e., they appear in all dialogs where element views can be chosen. The name used for the view is set by editing the view content. See here for details.
The interesting part are the permissions: Element views are only visible to users that have view and read permissions on the view content. In the demo, the "Template" element view is only visible for template developers. This is achieved by setting the permissions at the view's content accordingly:
- Overwrite inherited permissions
- Add only view and read permissions for the role template developer
The following figure shows the permissions for the view
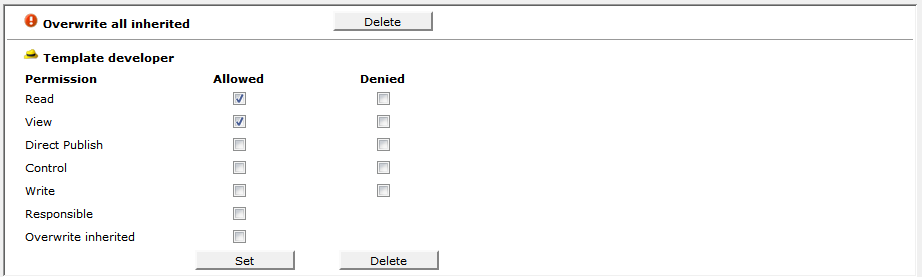
Similarly, the permissions on the "Layout" element view are set such that you need role "Editor" to see it. Hence, layout rows are not accessable by "Element authors".
3.2 Permissions for the content types
In the demo, content editors can add existing layout rows, but not create new ones or edit existing ones. This is achieved by setting according permissions in the explorer type configuration.
Lookup the definition in the opencms-modules.xml and watch out for the following lines - <accesscontrol> is the interesting node:
<explorertype name="bs-layoutrow" key="fileicon.bs-layoutrow" icon="bs-layoutrow.png"
              bigicon="bs-layoutrow_big.png" reference="xmlcontent">
    <newresource page="bs-menu" uri="newresource_xmlcontent.jsp?newresourcetype=bs-layoutrow"
                order="610" autosetnavigation="false" autosettitle="false" info="desc.bs-layoutrow"
                key="title.bs-layoutrow"/>
        <accesscontrol>
            <accessentry principal="ROLE.DEVELOPER" permissions="+r+v+w+c"/>
            <accessentry principal="ROLE.ELEMENT_AUTHOR" permissions="+r+v-w-c"/>
        </accesscontrol>
</explorertype>
More details on permissions on types are found here.
3.3 Example for user generated content
In the demo, blog entries can be added via a form in the online project. Also existing entries can be edited via that form - but only by logged in users. General information on user generated content are found here. In this section we only point you to the resources interesting for the example:
- The form is found under "Demo" -> "Blog" -> "Post a new blog"
- You are also directed to the form if you click "Edit this blog entry" in the detail view of a blog.
- The form is rendered via a formatter of the UGC configuration content
- The formatter is found under
/system/modules/com.alkacon.bootstrap.formatters/formatters/blog-ugc-form.jsp - The formatter configuration under:
/system/modules/com.alkacon.bootstrap.formatters/formatters/blog-ugc-form.xml
- The formatter is found under
- The JavaScript for the UGC connection:
/system/modules/com.alkacon.bootstrap.formatters/resources/js/ugc/ugc-blog.js
4 Cloning the demo modules
The demo modules provide a good starting point for your own website. At least if you want to use the bootstrap framework. Especially interesting is
- reusing the content types that wrap the bootstrap layout
- reusing and adjusting the content types that really contain content (e.g., blog entries)
- reusing and adjusting the formatters
Information on cloning a module are found here. To ease cloning, all content types have "bs-" prefix. When you clone a module it is generally adviced to delete the original module afterwards.