OpenCms has an inline editor that allows you to edit content inline - without opening the form-based content editor. The inline editor has to be configured in a content's formatter to make parts of the content inline editable. We summarize how to add inline editing facilities to your formatter.
1 What has to be configured to enable inline editing?
Inline editing has to be configured in a content's formatter. The value wrapper for each content field has the properties rdfa and rdfaAttr. The first returns the lazily initialized RDFA map for the nested sub-values, the second the RDFA annotation for the current value. These annotations are placed into HTML tags via the formatter. The page editor analysis this annotations and configures the inline editor accordingly.
Dependent on the type of the content field that should be directly editable, the place where to put the annotation differs.
- For content fields of
OpenCmsStringorOpenCmsHtmlthe annotations must be placed at a tag directly surrounding only the unmanipulated content value. - For fields of other types, the annotations can be placed at arbitrary tags. For these types values cannot be edited directly inline, but, at the tag where the annotation is placed, an edit button will appear, that allows to edit the content value.
- For content fields that are optional, or that can appear multiple times, also add and delete options are shown via RDFA annotations.
- For whole nested contents, the annotations can also be placed at arbitrary HTML tags.
2 Example with all variants of placing RDFA annotations
We show you an example that makes extensive use of the inline editing facilities. It is designed to provide you an overview on what is possible.
<%@page buffer="none" session="false" trimDirectiveWhitespaces="true" taglibs="c,cms"%>

<cms:formatter var="content" rdfa="rdfa" val="value">

<div class="margin-bottom-30">
<h2 class="headline" ${rdfa.Title}>${value.Title}</h2>
<c:forEach var="paragraph" items="${content.valueList.Paragraph}">
    <div ${paragraph.rdfaAttr}>
        <c:if test="${paragraph.value.Headline.isSet}">
            <div class="headline"><h3 ${paragraph.rdfa.Headline}>${paragraph.value.Headline}</h3></div>
        </c:if>
        <c:set var="rdfaFields">Link|Image${paragraph.value.Headline.isSet?'':'|Headline'}</c:set>
        <div ${paragraph.rdfa[rdfaFields]}>
            <div class="row">
                <div class='${paragraph.value.Image.exists?"col-md-8 col-sm-10 col-xs-12":"col-xs-12"}'>
                    <div ${paragraph.rdfa.Text}>${paragraph.value.Text}</div>
                    <c:if test="${paragraph.value.Link.exists}">
                        <p><a class="btn-u btn-u-small"
                              href="<cms:link>${paragraph.value.Link.value.URI}</cms:link>">
                             ${paragraph.value.Link.value.Text}
                        </a></p>
                    </c:if>
                </div>
                <c:if test="${paragraph.value.Image.exists}">
                    <div class="col-md-4 col-sm-2 hidden-xs">
                        <div class="thumbnail-kenburn"><div class="overflow-hidden">
                            <cms:img src="${paragraph.value.Image}"
                                     noDim="true" cssclass="img-responsive" />
                        </div></div>
                    </div>
                </c:if>
            </div>
        </div>
    </div>
</c:forEach>
</div>

</cms:formatter>
The example formatter renders a content that has a field Title and a list of one or more Paragraphs as nested contents. Each Paragraph has an optional Headline, Image and Link (which is itself a nested content), and a mandatory Text field.
Here are the parts of the formatter relevant for inline editing:
- Line 3: The attribute
rdfa="rdfa"in the<cms:formatter>tag exposes a variablerdfaas abbreviation forcontent.rdfa. This is not mandatory, but a convenience feature, just asval="value"exposesvalueas abbreviation forcontent.value. - Line 6: The
${rdfa.Title}at the<h2>tag enables inline editing for theTitle. It is mandatory that inside of the<h2>tag there is only the unmanipulated value ofTitle. Note that we use therdfavariable when writingrdfa.Titleexposed via the<cms:formatter>tag. We could have also writtencontent.rdfa.Title. - Line 8: We use
${paragraph.rdfaAttr}to get the correct RDFA annotation for the paragraph. Here it is easier to use the propertyrdfaAttr, instead ofcontent.rdfa.Paragraph[status.index], where status would have to be exposed via<c:forEach ... statusVar="status">. - Line 10: Here we make the paragraph's headline editable directly. It's similar to line 6, where the title is made directly editable.
- Line 13: We set the RDFA annotations for
Link,Imageand, if the headline is not set and thus directly editable (see line 10), forHeadline. At the annotated<div>, edit points for all two (or three) content fields will appear. Note that rdfaFields is set in line 12 to a pipe-separated list of content fields. Such a pipe separated list is the only way to add more than one RDFA annotation to an HTML tag. Writing<div ${paragraph.rdfa.Link} ${paragraph.rdfa.Image}>instead, does not work.
A further interesting point here is, that the RDFA annotation for the headline is set differently, depending on the existence of a headline. - Line 16: Here the
Textis printed in a<div>and made directly editable. Text is of typeOpenCmsHtml. Here again, make sure that the value ofTextis the only content of the annotated<div>.
What is not directly present in the example, is the possibility to navigate through the content using the attribute value and when you are at the right place, use rdfa. For example, content.value.NestedContent.rdfa.NestedTitle is a valid expression.
The following figure shows the resulting inline editor for (a slightly more complex variant of) the above formatter.
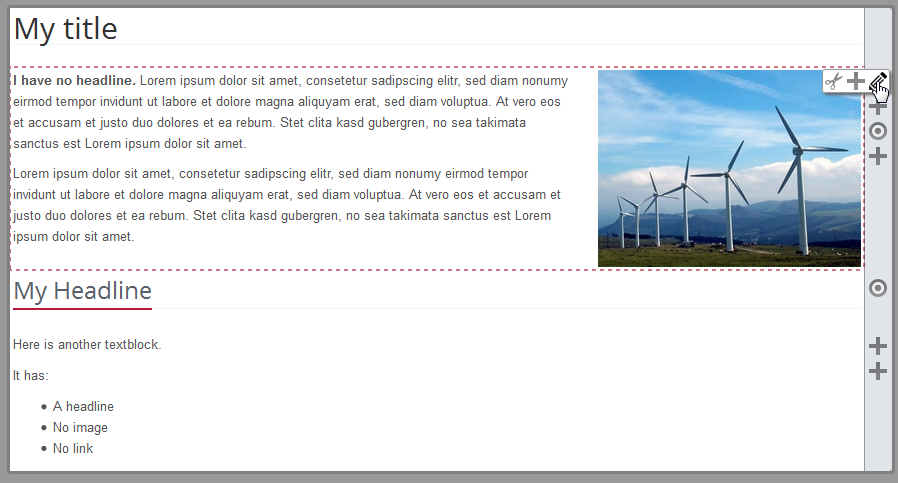
All texts rendered by the formatter can be edited inline. Moreover, a lot of edit points and plus symbols appear at the right-hand side of the editor. These are the shown because of RDFA annotations for content fields that are not directly editable. In particular, the edit point we hover over belongs to the first paragraph, the plus directly below to this paragraphs headline (that is not provided in the content). Furthermore, we get and edit point to edit or remove the image and a plus sign to add a link to the first paragraph.
For the second paragraph we again get an edit point for editing the paragraph and two pluses: one for adding an image and one for adding a link. Note that the headline of the second paragraph is directly editable and has no extra edit point - as it has in the first paragraph.
Fig. [inline_editor_result]: The inline editor as configured via (a variant of) the above formatter.
3 Limitations for inline editing
There are some practical limitations when using inline editing. Edit points (or plus symbols) do not directly show to which content field they belong. Therefore, if you add to much of them, inline editing will not be useful anymore. Moreover, when it comes to choices of different field types, inline editing is still supported, but will be even more complicated to use (we omitted such a use case in the example above).
Technically, inline editing is limited to content that is rendered with a formatter. That in particular means, that it is not supported for contents shown in lists.